Build and Publish Docker Images with Jenkins Pipeline
A step-by-step guide on how to streamline Docker workflows with Jenkins.


Introduction
In the modern software development life cycle, Docker plays an important role in not just enabling a consistent and predictable environment for applications but also ensuring that code is shipped faster while ensuring flexibility.
While Docker takes care of the containerization aspect of applications, CI/CD tools ensure the integration of automation into the software life cycle thus enhancing higher efficiency and reduction of production delivery time.
One such CI/CD tool that handles automation needs is Jenkins. Jenkins stands out as an automation tool for building, testing, and deploying applications due to its seamless integration with Docker. In this article, we are going to illustrate the step-by-step process to integrate Docker into the Jenkins pipeline, write a basic Jenkins pipeline for Docker build, and Push an Image into the Docker registry.
Prerequisites
To follow up on this tutorial, do the following:
Install Java. This is necessary to adequately install and configure Jenkins on your machine.
Install and configure Jenkins on your machine
Install Docker on your machine
Create an account on Dockerhub. We will be using this as our registry where we push images. Ensure to store your username and password safely. We will be needing it as we progress.
Setting up Jenkins for Docker Builds
Jenkins Pipeline consists of diverse sets of plugins that are designed to facilitate the implementation and seamless integration of continuous delivery within Jenkins. It plays an essential role in automating CI/CD, allowing developers to define, visualize, and manage the entire application delivery process. To integrate Docker into Jenkins, follow the steps below:
Install Docker on your machine
In case you skipped the prerequisites, you need to install Docker on the same machine as your Jenkins.
Run your Jenkins Using the WAR file
To do this, follow the steps below:
Open a command prompt or terminal
Navigate to the directory where your Jenkins is stored
Run this command
java -jar jenkins.war
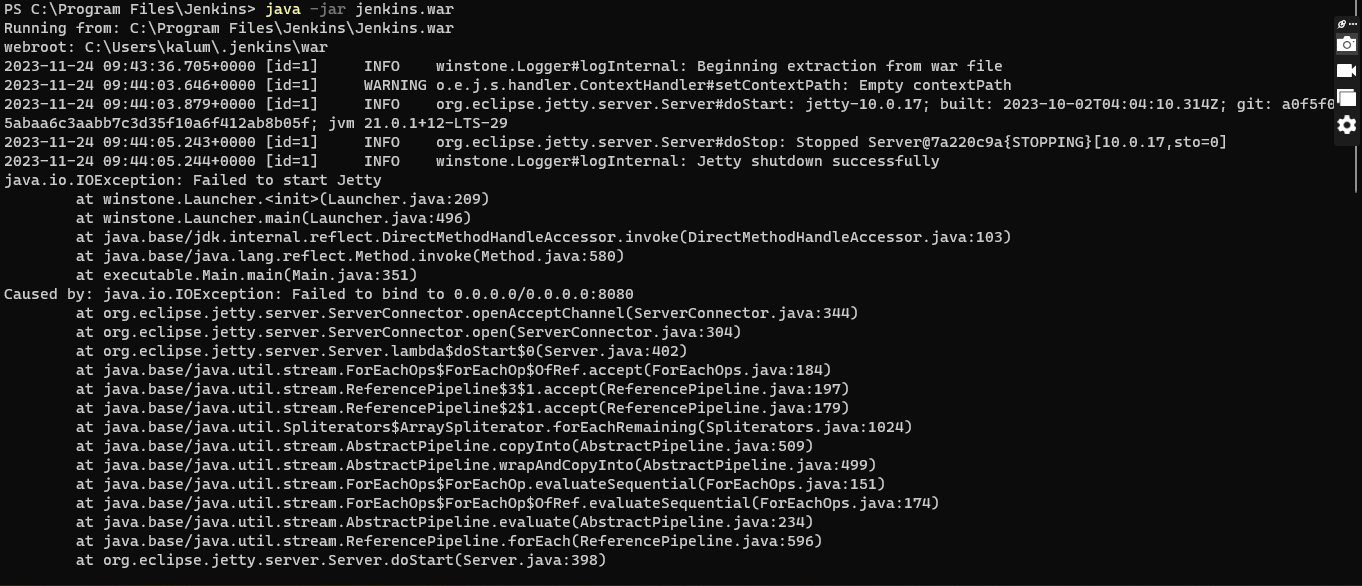
- Once Jenkins has started, open a web browser and go to http://localhost:8080 (or the specific port you configured Jenkins to run on).
PS: When you first run Jenkins, it will ask for an initial admin password. You can find this password in the Jenkins home directory in a file named secrets/initialAdminPassword.
Install Jenkins Docker Plug-in
This Docker plug-in provides additional features and makes the integration process easier. Follow the steps below to do this
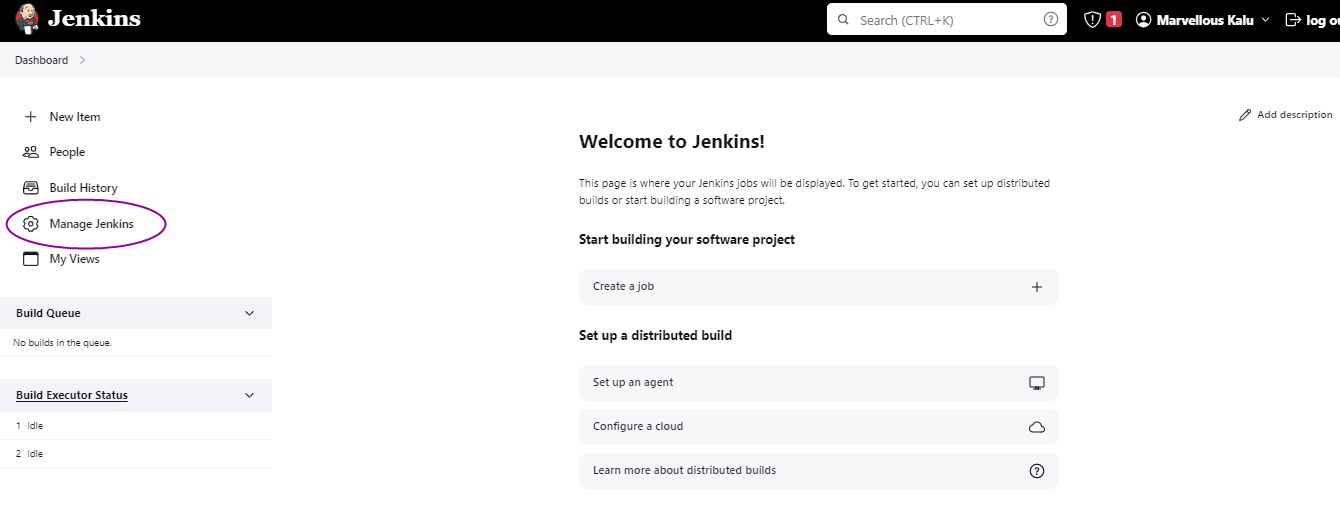
- In the Jenkins dashboard, click on Manage Jenkins
- In the Manage Jenkins window, click on Plugins
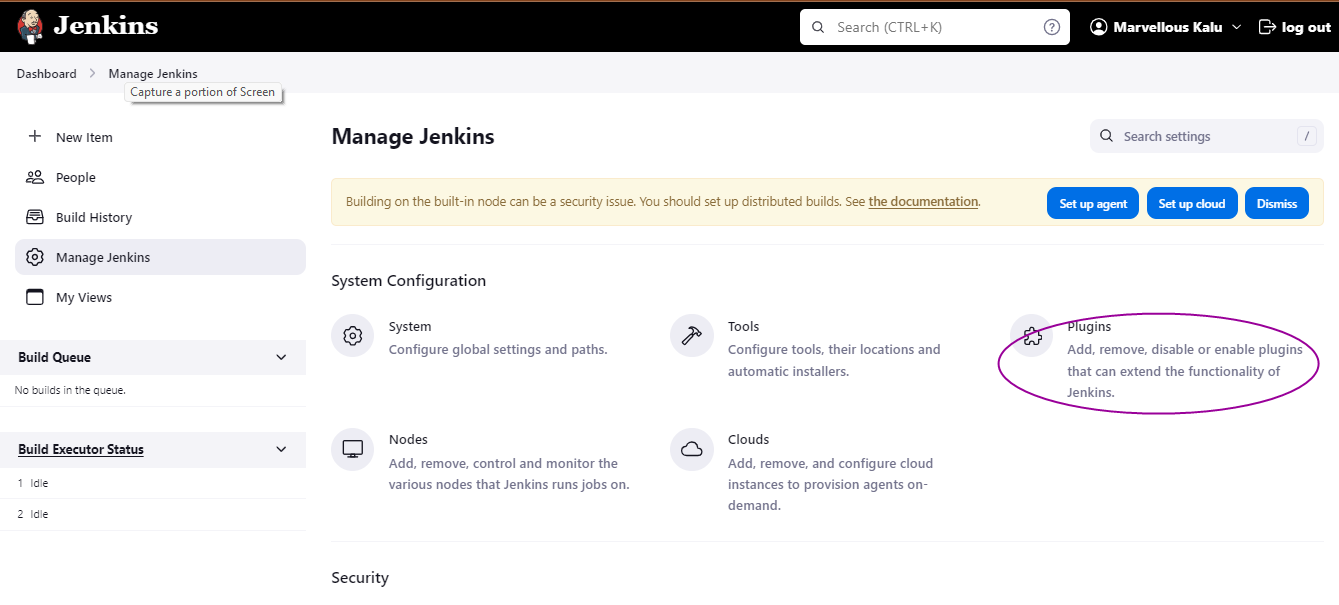
- In the Plugins tab displayed on the left panel, click on Available Plugins.

- In the search bar for available plugins, type Docker. Click on the Docker plugin and click on Install.

In the Download progress page that displays next you will see different items being installed. Once they are all downloaded successfully, scroll to the bottom of the page and click on Go back to the top page.
Install the Docker Pipeline Plugin also.


Writing a Basic Jenkins Pipeline for Docker Build
Before diving deep into this section, ensure you have your app and dockerfile already pushed to Git Hub. Here is the repo to my app in Git Hub. I created a simple Python guessing game. That runs as shown below.

With that addressed, let’s take a deep dive into writing a basic Jenkins pipeline for the Docker build.
Create Credentials for Docker in Jenkins Hub
Here you are going to create credentials for Docker Hub because you will create a pipeline that builds a Docker image and uploads the Docker image to Docker Hub. To do this, follow the steps below:
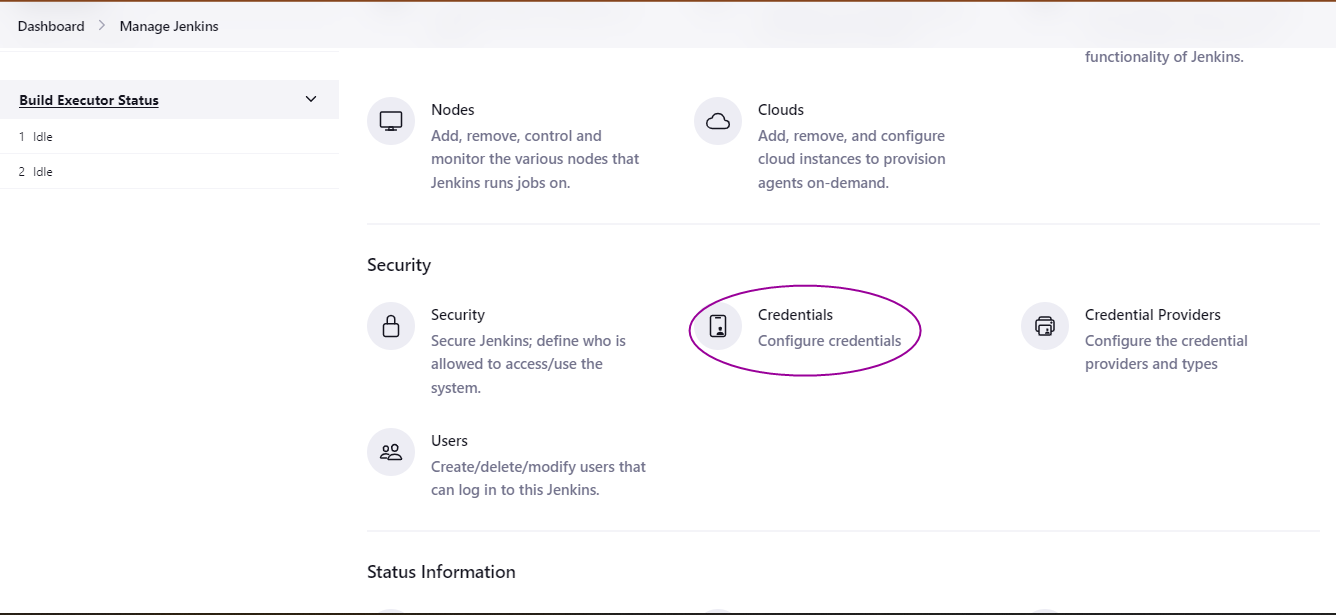
In your Jenkins dashboard, click on Manage Jenkins
Scroll down and click on Credentials
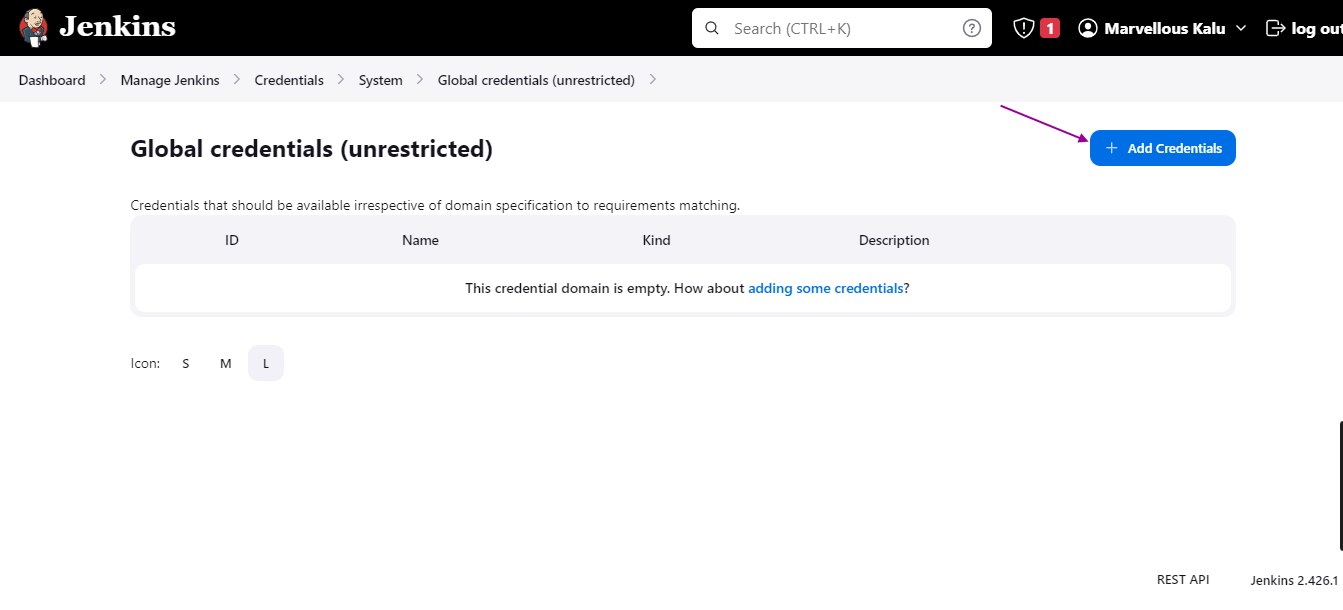
Click on System. Next, on the page that opens, Click on Global credentials (unrestricted).
Click on Add Credentials
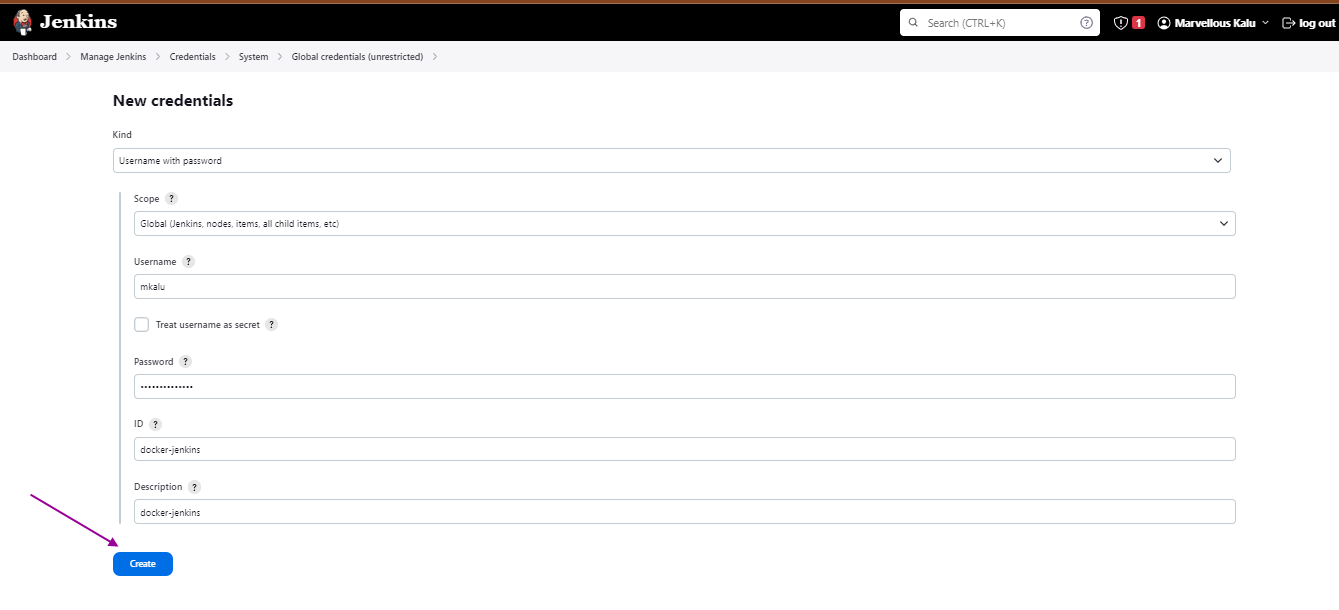
Enter your Docker Hub username, and password, and enter any ID and description of your choice. Click on Create.
You have successfully created credentials for Docker Hub in Jenkins.

Creating a Simple Jenkins Pipeline to Checkout and Build a Docker Image
We are going to first carry out the basic configuration for our project and next write the pipeline script.
Basic Configuration
On your dashboard, click on Create a job (if you are a new user) otherwise, click New Item.
Enter the Item Name, select Pipeline, and click OK.
Enter a suitable description of your project, Click on GitHub project, and in the space that appears, enter the link to your project’s repo. Next, under Build triggers, click on the GitHub hook trigger for GitScm polling.

Pipeline Scripts
Checkout Scripts
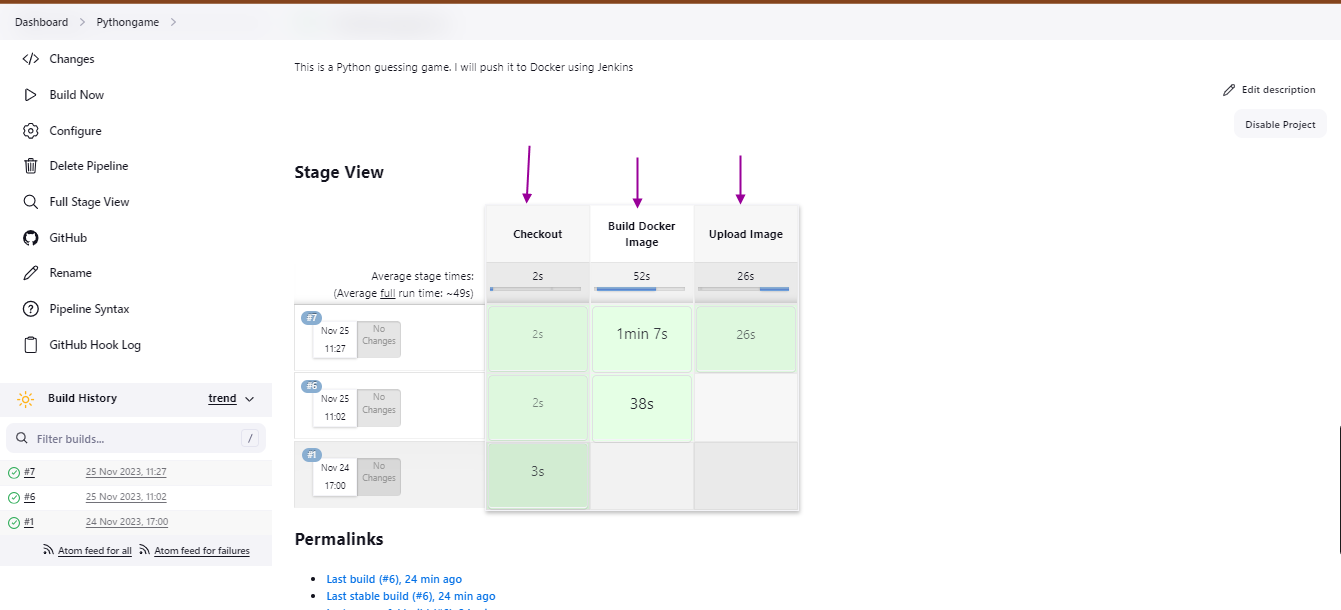
We are going to define a stage in the Jenkins pipeline and call it ‘Checkout’. This stage will be responsible for fetching the latest version of the source code from the specified Got repository and branch, making it available for subsequent stages in the pipeline.
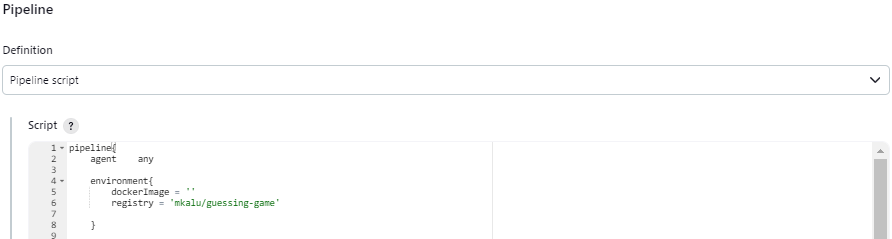
Scroll down to the Pipeline section. Leave the Definition as Pipeline Script.
In the pipeline script box, enter the code below
pipeline{
    agent any

    environment{
        dockerImage = ''
    }

}
This code provides the foundation for creating a Jenkins pipeline. It sets it up with an agent configuration and an environment variable.
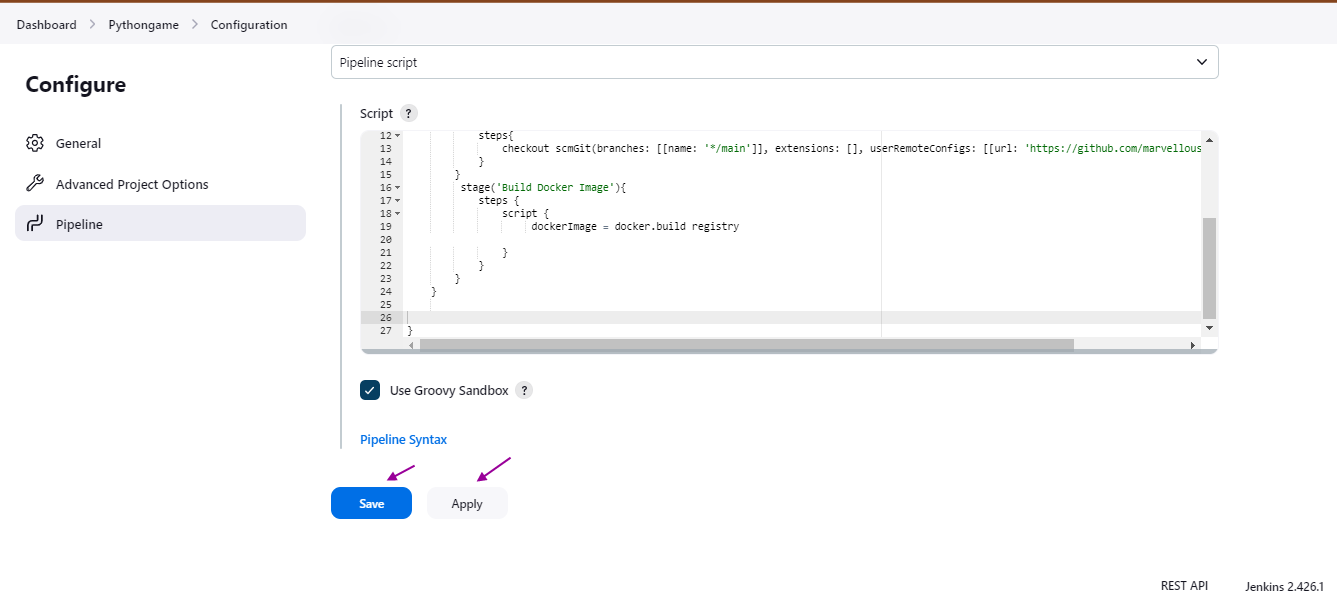
- Inside the pipeline, create a stage called Checkout that retrieves the latest source code from a Git repository. It checks out the 'main' branch of the repository using the checkout step provided by Jenkins.
stages {
        stage('Checkout') {
            steps{
                (Enter your checkout scmGit details here)
            }

        }
To get your checkout ScmGit details, follow the steps below:
- Click on Pipeline Syntax at the end of the page

- A new tab will be opened. On the page that displays, under Sample steps, select checkout: Check out from version control.
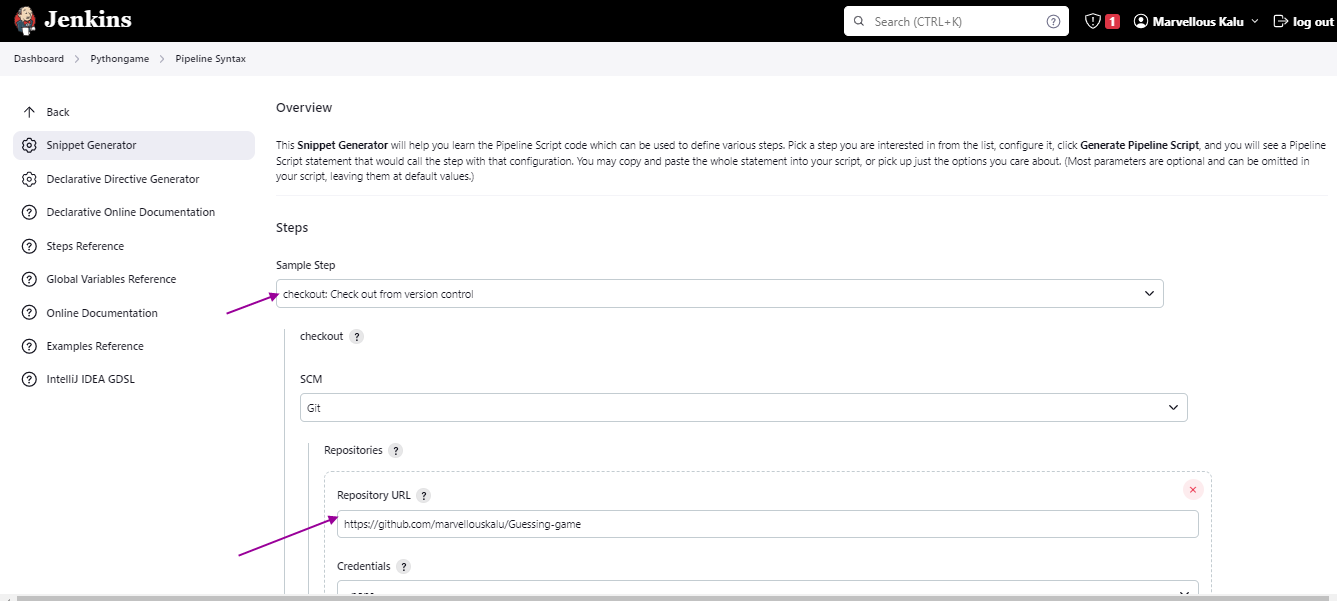
- Scroll down and under the repository URL, enter the URL of your Git Hub repo. Under Branch Build, edit the option there to main if your repo branch is main else, enter your repo branch. Click on Generate pipeline script and your checkout script will be generated.
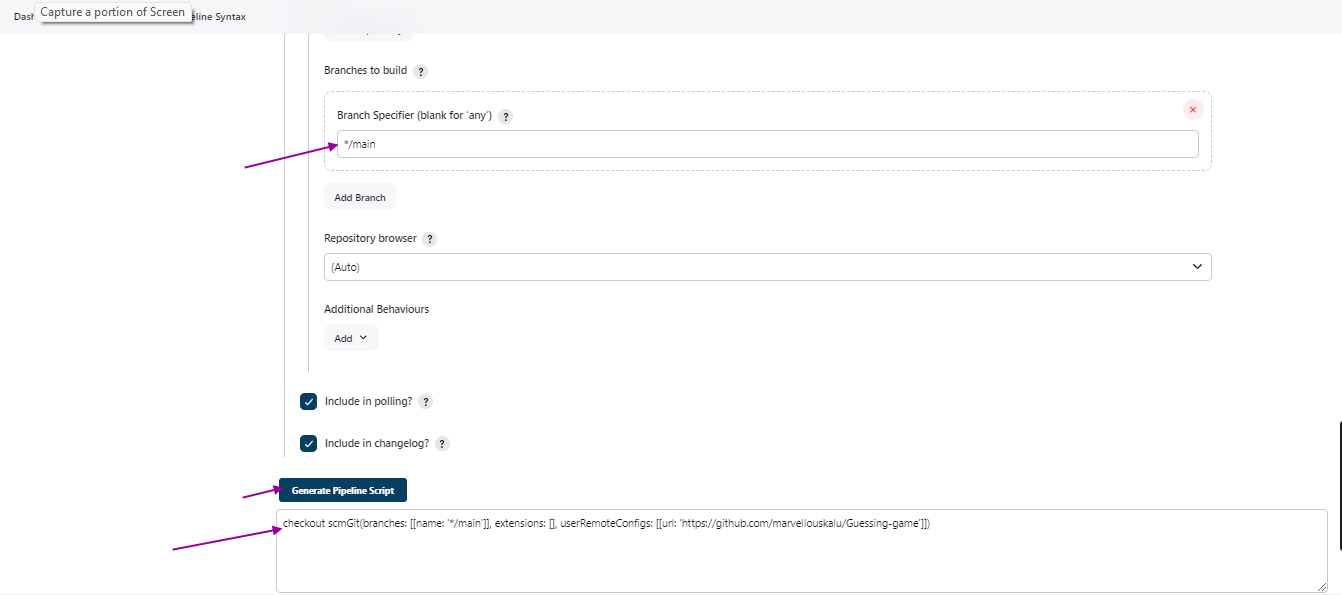
Copy the generated script.
- Enter the copied script into your checkout stage. You should have something like the image below.

Click on save. Your work gets saved and a new page is displayed.
Click on Build now.

- You have successfully performed the checkout operation in your Jenkins pipeline.

Building your Docker Image in Jenkins Pipeline
On your dashboard, click on Configure to go back to your pipeline.
Scroll to the environment variables you created earlier and create a variable called registry. Assign the values
'my-dockerhub-username/my-repo-name'.Ensure to replace the value 'my-dockerhub-username/my-repo-name’ with your dockerhub username and your repo name respectively or any name of your choice.
Pro Tip: Do not use capital letters for your docker repository name.
Create a new stage that will handle the building of your docker image using the code below.
 stage {
         stage('Build Docker Image'){
             steps {
                 script {
                      dockerImage = docker.build registry

                 }
             }
         }
     }
This stage does the building of our Docker image.
Click on Apply and Save
A new page opens. Now, click on Build Now to build your Docker image.

Integrating Docker Image Push to Registry
In this section, we will push our new Image to the Docker Hub library with Jenkins.
We will create a new stage for the upload of our already-built image. The code below does the work.
 stage('Upload Image') {
             steps {
                 script {
                     docker.withRegistry( '', registryCredential ) {
                     dockerImage.push()
                     }
                 }
             }
         }
In your environment block, create a new variable called registryCredential and assign the ID value of your credential created in the previous step. ( Check the Create Credentials for Docker in the Jenkins Hub subheading).
Here is mine registryCredential = 'docker-jenkins'
Click on Apply and Save
Lastly, click on Build Now to push your Image
There you have it, your 3 processes successfully achieved.
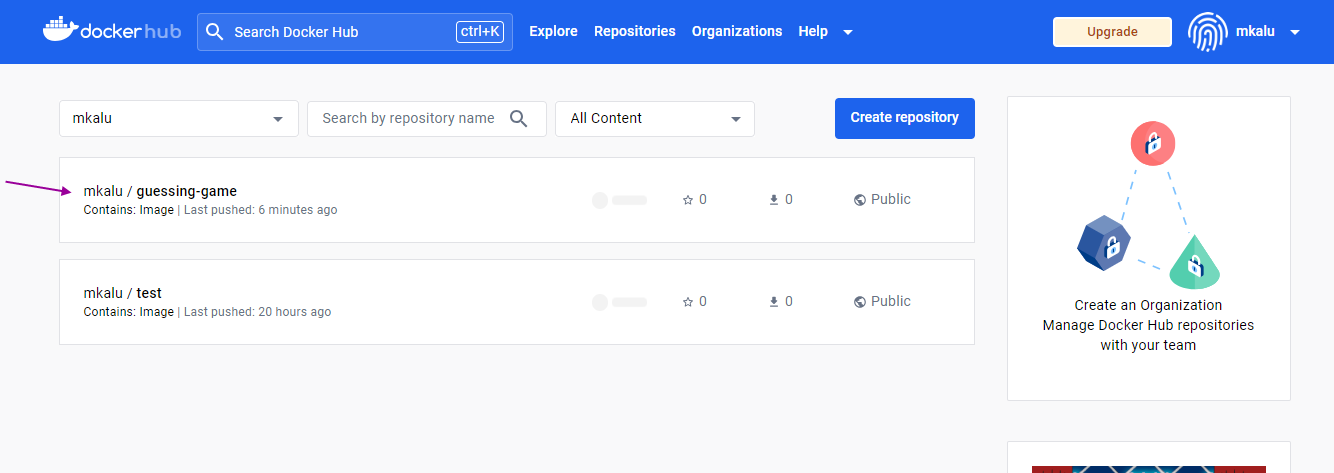
To further verify the push, log in to your Docker Hub, and you will see your image present in your repository library.
Pro Tip: To avoid errors throughout this tutorial, ensure your docker desktop is running always.
Conclusion
This tutorial guide provides an encompassing approach to streamlining Docker workflows using Jenkins. By setting up Jenkins for Docker builds, creating comprehensive Jenkins pipelines, and optimizing Docker build configurations, developers can enhance their CI/CD processes and ensure efficient and secure application delivery.