How to Create a Visually Appealing Online Registration Form With HTML
Did you know you can create a visually appealing registration form with just HTML? Here is a step-by-step process on how I did mine.

I write about my software engineering projects and learning
Introduction
Over the last two weeks, I have been working on learning HTML, practicing writing several HTML codes, and understanding the impact of HTML in today's world.
After a series of deliberate practices, I decided to carry out my first HTML project, creating a student registration form using just HTML since I am yet to figure out CSS, Javascript, and other programming languages.
For this project, the editor I used was the VScode, and you can download it here. However, feel free to use other editors such as Sublime Text, Atom, etc.
Prerequisites
Here are things you need to check to carry out this task effectively
- Basic HTML knowledge. This will help explain the functions of each tag better.
- A code editor. I used VScode
- A good work setup
Uses of a Registration Form
In simple terms, a registration form is a collection of fields used to collect a user's data. While a registration form can be used for several events, its core purpose is to collect and store the data of its users for future use.
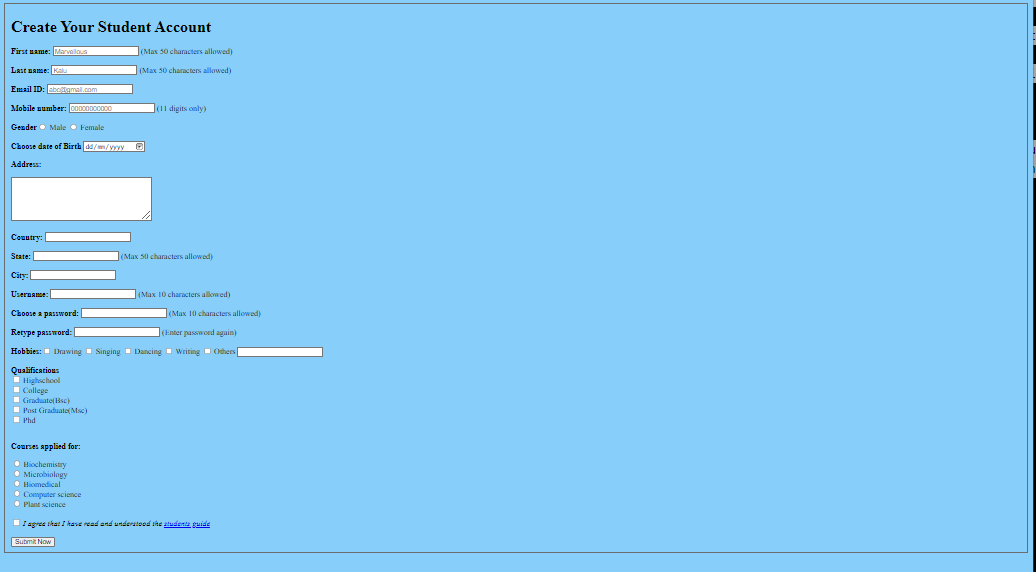
This project was centered on the creation of a student online registration form. Let's head into the more exciting parts. Here is an image of what I will be creating
Introductory Codes
After setting up your Vscode, it's time to begin writing your codes. The first step is to write the introductory codes—these lines of code form the structure of your project.
The DOCTYPE HTML declares that you are writing an HTML language to the editor. Next is the head, which houses the heading and title of your project.
<!DOCTYPE html>
<html>
    <head>
        <title></title>
    </head>
    <body></body>
</html>
After writing the introductory code, it's time to fill in your title. You can give any title to your project, and this is what will show up on the top page of your browser as the title of your page. For this project, I preferred giving it the title "My First HTML Project" as it is the first HTML project I have carried out. I also decided to input a background color for my form. Do well to have fun as you code too.
<!DOCTYPE html>
<html>
    <head>
        <title>My First HTML Project</title>
    </head>
    <body bgcolor="lightskyblue">
</body>
</html>
If you got this step right, you should have the Image below.
Fill in Other Details of Your Form
Now, it's time to fill in other details of your form. To get this accurate, I advise you to write out the structure of your form on a sheet of paper first so you can easily take a glance and decide what code to write next.
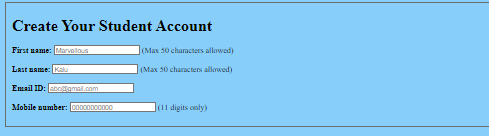
All of these will be inserted into the body element. The fieldset tag creates a defined line that houses the structure of the form. H1 tag stands for heading1, and I named mine "Create Your Student Account." You can name yours based on the purpose of your online form.
Next, you need to input the tag form to tell the editor that you are about to create a form. Next, use the label tag to create a label for your different input fields. The first field in this form is the first name. You must type your text in the label element and declare your input type. Always use a placeholder if you want such a feature in your form.
Repeat the same line of code for the last name, email id, and phone number but always ensure you change the input type, ID, name, and placeholder to reflect what you want.
<!DOCTYPE html>
<html>
    <head>
        <title>My First HTML Project</title>
    </head>
    <body bgcolor="lightskyblue">
 <fieldset>
            <h1>Create Your Student Account</h1>
             <form>
                <label for="First name">
                    <Strong>First name:</Strong>
                    <input type="text" id="first name" name="first name" placeholder="Marvellous"> (Max 50 characters allowed)
                </label>
                <br> <br>
<label for="Last name">
                    <strong>Last name:</strong>
                    <input type="text" id="last name" name="last name" placeholder="Kalu"> (Max 50 characters allowed)
                </label>
                <br><br>
                <label for="Email ID">
                    <Strong>Email ID:</Strong>
                    <input type="email" id="email" name="email" placeholder="abc@gmail.com">
                </label>
                <br><br>
                <label for="phone number">
                    <strong>Mobile number:</strong>
                    <input type="phone number" id="mobile number" name="mobile number" placeholder="00000000000"> (11 digits only)
                </label>
                <br><br>
 </form>
        </fieldset>
    </body>
</html>
If done right, this line of code will come up with the Image below. This is just the beginning of your form. Let's add more fields to the registration form.
Inputting More Fields into Your Form
The following field I inputted in my registration form was the gender and date of birth field. This is how you can do that effortlessly.
For declaring the gender field, you need to use the radio input type, which helps the users select only one option. Use the date input type to declare the date of the birth option.
<Strong>Gender</Strong><input type="radio" id="male" name="gender" value="male">
                <label for="Male">Male</label>
                <input type="radio" id="female" name="gender" value="female">
                <label for="female">Female</label>
                <br><br>
                <label for="Date of Birth"> <strong>Choose date of Birth</strong>
                        <input type="date">
                <br>
To create a field that will enable the user to input an address, country, city, and state, this is how I did it.
<label for="multilineinput">
                        <p><strong>Address:</strong></p>
                        <textarea rows="5" cols="30" id="multilineinput"></textarea>
                     </label>
                     <br> <br>
                       <label for="Country">
                        <Strong>Country:</Strong>
                        <input type="text" id="state" name="state">
                    </label>
                    <br><br>
Now, you need to do the same for city and state. This form is a student online registration form containing the username and password option. To create these fields, you need to create a label for the username and password. Ensure to change each description's input type, id, and name. The code below shows you an example. Use the same line of code for retyping passwords but ensure you edit the label, id, name, and how you want it to appear.
 <label for="Username">
                        <Strong>Username:</Strong>
                        <input type="text" id="username" name="username"> (Max 10 characters allowed)
                    </label>
                    <br><br>
                    <label for="Password">
                        <Strong>Choose a password:</Strong>
                        <input type="password" id="password" name="password"> (Max 10 characters allowed)
                    </label>
                    <br><br>
To display the hobbies field, you are to use a checkbox. A checkbox allows the user to select a variety of options. It differs from the radio tag, allowing the user to choose only one option. For this part, the code below comes in handy. The code below displays the drawing description. You need to create more input types and labels to show other kinds of hobbies.
<Strong>Hobbies:</Strong><input type="checkbox" id="hobby" name="Drawing" value="Choose hobby">
                    <label for="Hobby"> Drawing</label>
Use this code below to enable the user to indicate hobbies that aren't listed in your code.
 <label for="Hobby">Others</label>
                    <label for="Hobby">
                    <input type="text" id="others" name="others"> </label>
                    <br> <br>
Use the same input type and label to create other qualifications but ensure to change the input id, value, and how you want your label to appear to suit your taste. Always end with a double br This breaks the code lines and differentiates one section from the next.
 <Strong>Qualifications</Strong><br>
                    <input type="checkbox" id="High school" name="High school" value="Still in high school">
                    <label for="Qualification1"> Highschool</label><br>
I used the radio input type to display the courses applied section to allow the user to select only one course. The code below should display only Biochemistry. If you want to add more courses to give the user various options, you should copy the line of code below and edit them to suit your choices.
<p><Strong>Courses applied for:</Strong></p>
                    <input type="radio" id="Biochemistry" name="Course1" value="Biochemistry">
                    <label for="Biochemistry">Biochemistry</label><br>
We have come to the last section of this form. To spice this registration form. I decided to create a checkbox input type that allows the user to tick if only they have read the student affirmation guide. I also hyperlinked the texts to enable the user to click to read the student affirmation guide.
A button-type was inputted to display the submit now option to wrap up this form.
<input type="checkbox" id="Yes" name="students guide" value="affirm to student guide">
                <label for="Student guide affirmation"> <i>I agree that I have read and understood the <a href="www.google.com">students guide</a> </i> </label>
                <br><br>

                <button type="Submit now"> Submit Now</button>
Final Code Result
Putting everything together, below you have the code and the result.
<!DOCTYPE html>
<html>
    <head>
        <title>My First HTML Project</title>
    </head>
    <body bgcolor="lightskyblue">
        <fieldset>
            <h1>Create Your Student Account</h1>
            <!--This is my first html project. I hope it goes well-->
            <form>
                <label for="First name">
                    <Strong>First name:</Strong>
                    <input type="text" id="first name" name="first name" placeholder="Marvellous"> (Max 50 characters allowed)
                </label>
                <br> <br>
                <label for="Last name">
                    <strong>Last name:</strong>
                    <input type="text" id="last name" name="last name" placeholder="Kalu"> (Max 50 characters allowed)
                </label>
                <br><br>
                <label for="Email ID">
                    <Strong>Email ID:</Strong>
                    <input type="email" id="email" name="email" placeholder="abc@gmail.com">
                </label>
                <br><br>
                <label for="phone number">
                    <strong>Mobile number:</strong>
                    <input type="phone number" id="mobile number" name="mobile number" placeholder="00000000000"> (11 digits only)
                </label>
                <br><br>
                <Strong>Gender</Strong><input type="radio" id="male" name="gender" value="male">
                <label for="Male">Male</label>
                <input type="radio" id="female" name="gender" value="female">
                <label for="female">Female</label>
                <br><br>
                <label for="Date of Birth"> <strong>Choose date of Birth</strong>
                        <input type="date">
                <br>
                     <label for="multilineinput">
                        <p><strong>Address:</strong></p>
                        <textarea rows="5" cols="30" id="multilineinput"></textarea>
                     </label>
                     <br> <br>
                     <label for="Country">
                        <Strong>Country:</Strong>
                        <input type="text" id="state" name="state">
                    </label>
                    <br><br>
                     <label for="State">
                        <Strong>State:</Strong>
                        <input type="text" id="state" name="state"> (Max 50 characters allowed)
                    </label>
                    <br><br>
                    <label for="City">
                        <Strong>City:</Strong>
                        <input type="text" id="City" name="City">
                    </label>
                    <br><br>
                    <label for="Username">
                        <Strong>Username:</Strong>
                        <input type="text" id="username" name="username"> (Max 10 characters allowed)
                    </label>
                    <br><br>
                    <label for="Password">
                        <Strong>Choose a password:</Strong>
                        <input type="password" id="password" name="password"> (Max 10 characters allowed)
                    </label>
                    <br><br>
                    <label for="Password">
                        <Strong>Retype password:</Strong>
                        <input type="password" id="password" name="password"> (Enter password again)
                    </label>
                    <br><br>
                    <Strong>Hobbies:</Strong><input type="checkbox" id="hobby" name="Drawing" value="Choose hobby">
                    <label for="Hobby"> Drawing</label>
                    <input type="checkbox" id="hobby" name="Singing" value="Choose hobby">
                    <label for="Hobby">Singing</label>
                    <input type="checkbox" id="hobby" name="dancing" value="choose hobby">
                    <label for="Hobby">Dancing</label>
                    <input type="checkbox" id="hobby" name="writing" value="choose hobby">
                    <label for="Hobby">Writing</label>
                    <input type="checkbox" id="hobby" name="others" value="choose hobby">
                    <label for="Hobby">Others</label>
                    <label for="Hobby">
                    <input type="text" id="others" name="others"> </label>
                    <br> <br>

                    <Strong>Qualifications</Strong><br>
                    <input type="checkbox" id="High school" name="High school" value="Still in high school">
                    <label for="Qualification1"> Highschool</label><br>
                    <input type="checkbox" id="College" name="College" value="Still in college">
                    <label for="Qualification1"> College</label><br>
                    <input type="checkbox" id="Graduate" name="Graduate" value="University graduate">
                    <label for="Qualification1"> Graduate(Bsc)</label><br>
                    <input type="checkbox" id="Post graduate" name="Post Graduate" value="Msc in view">
                    <label for="Qualification1"> Post Graduate(Msc)</label><br>
                    <input type="checkbox" id="Phd" name="Phd" value="Phd in view">
                    <label for="Qualification1"> Phd</label>
                    <br><br>
                    <p><Strong>Courses applied for:</Strong></p>
                    <input type="radio" id="Biochemistry" name="Course1" value="Biochemistry">
                    <label for="Biochemistry">Biochemistry</label><br>
                    <input type="radio" id="Microbiology" name="course2" value="Microbiology">
                    <label for="Microbiology">Microbiology</label><br>
                    <input type="radio" id="Biomedical" name="Course3" value="Biomedical">
                    <label for="Biomedical">Biomedical</label><br>
                    <input type="radio" id="Computer Science" name="COurse4" value="Computer science">
                    <label for="Computer science">Computer science</label><br>
                    <input type="radio" id="Plant science" name="course5" value="Plant science">
                    <Label for="Plant science">Plant science</Label>
                    <br><br>

                <input type="checkbox" id="Yes" name="students guide" value="affirm to student guide">
                <label for="Student guide affirmation"> <i>I agree that I have read and understood the <a href="www.google.com">students guide</a> </i> </label>
                <br><br>

                <button type="Submit now"> Submit Now</button>
            </form>
        </fieldset>
    </body>
</html>
Image of the student registration form
Conclusion
Creating a colorful registration is not as hard as you thought it to be right? That's the beauty of HTML. It helps you give structure and form to your webpage. I believe that with CSS, we can make a more visually appealing form. So soon, I will be updating this with the tutorial on how to create a more visually appealing form with HTML and CSS. For now, Ciao!


