

Introduction
Continuous integration is an important aspect of the software development life cycle. It not only benefits the developers but also the company with the product. Continuous integration ensures that quality products that meet required standards are developed, reduces risks, and encourages faster release dates.
In the fast-paced landscape of software development, the need for tools that enhance efficiency and reliability is increasing. Selenium, an open-source testing framework, and Jenkins, a popular automation server have become integral components of modern development pipelines.
Integrating Selenium Python tests with Jenkins allows teams to automate the execution of tests, monitor code quality, and promptly address any defects.
This article will teach you how to integrate Selenium Python tests into Jenkins and accelerate the development cycle.
Prerequisites
To follow up on this tutorial, do the following
Install Python
Install Selenium webdriver
Install Java
Install Jenkins
Have a GitHub account
Writing Selenium Python Test Scripts
In this tutorial, we will be using a selenium pytest script I wrote for testing a login page using the parameterized pytest function. This script opens the browser, enters the URL to be tested, fills in the user's details, submits the form, and waits for the success page to open. When it does under 10 seconds, it asserts that the form was submitted successfully and closes the page. This is done for 3 different users.
You can find this selenium project in my GitHub repo.
If you already have a Selenium script you want to test, feel free to upload it to GitHub and store the URL of the repo as it will be used during the Jenkins integration.
Pro Tip: Ensure you create a virtual environment in your folder before pushing your project to GitHub. Also after you have executed your test and seen that it works correctly, use the requirements.txt file to list the dependencies for your project. To do this, use this code pip freeze > requirements.txt. Next, create a .gitignore file and input your virtual environment and the .idea folder.

Jenkins Plugin configuration
To get started with this tutorial, you must install specific plugins in Jenkins.
Navigate to your Jenkins dashboard
In the left sidebar, click on Manage Jenkins
In the manage Jenkins page, click on Plugins
Click on the Available tab and search for the following plugins one after the other: Git and GitHub plugin, Chromedriver plugin, HTML publisher, Python plugin, and Shining Panda.
Ensure you selected these plugins. Now, click on Install.
After the installation is complete, Jenkins will display a success icon beside these plugins. Now, scroll down and click on Go back to the top page.
All these plugins ensure the smooth execution of this project.
Integrating Selenium Test in Jenkins
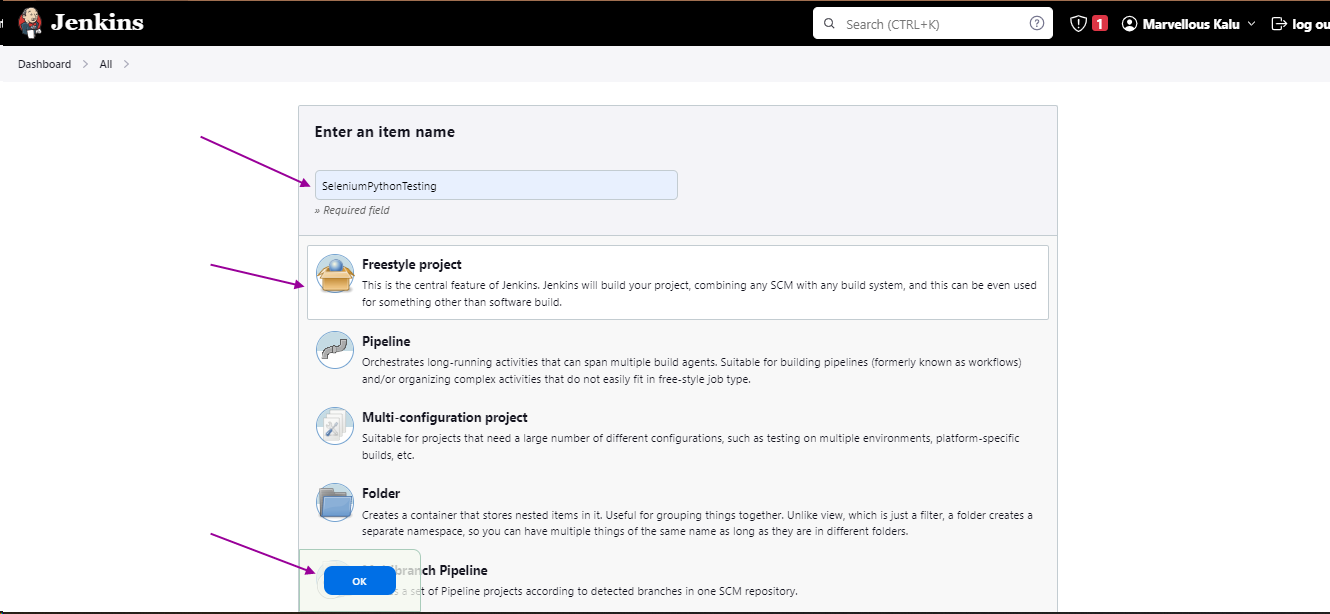
Step 1: Create a new Job
Navigate to your Jenkins Dashboard and click on New Item. Now, enter a name for your project, click on freestyle project, and OK.
Step 2: General Configuration
Enter a description for your project.

Step 3: Source Code Management
Under source code management, click on Git. Enter the URL to your GitHub project repo. Next, configure the branch. For this project, mine is the main branch so I erased the existing master and entered main.

Step 4: Build Steps
Scroll down to Build Steps and click on Add build step drop-down. Now click on Custom Python Builder.
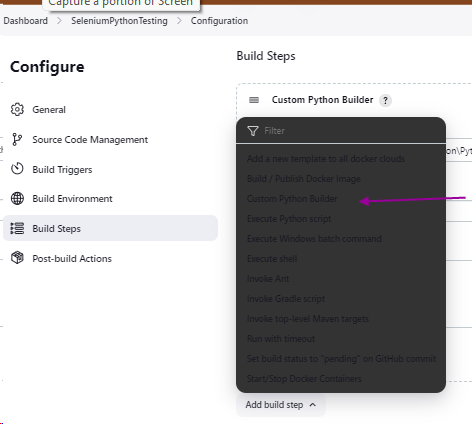
A new build step is opened called Custom Python Builder. In the home field inside this build step, enter the path for Python on your machine. Next under Nature, select Shell.

In the command field, enter the command below
python -m venv env

call .\Scripts\activate

pip install -r requirements.txt

pytest -v -s
This command creates a virtual environment for Python, activates this virtual environment, installs the requirement for the project, and executes the test by calling pytest.
Step 5: Run the test
Click on Apply and Save. Next, click on Build Now. Your test runs and executes as it should.

Post-Build Actions
Post-build actions are a set of actions that are executed after the main build steps of a project have been completed. These actions allow users to perform additional tasks based on the result of the build. Some post-build actions in Jenkins include email notifications, publishing artifacts, publishing test reports, triggering other jobs, cleaning up, quitting containers, etc.
In this tutorial, we will be publishing the HTML report for our project. Rather than going to the console output to view the outcome of the report, our project report will be printed into an HTML file so we know which code passed, skipped or failed. To do this, follow the steps below.
Step one: Edit your build step command
Navigate to your project’s build step. In the command field, edit the pytest command to contain our HTML report. This is the code pytest -v -s --html=report.html
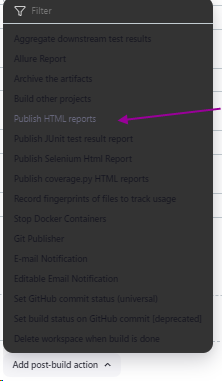
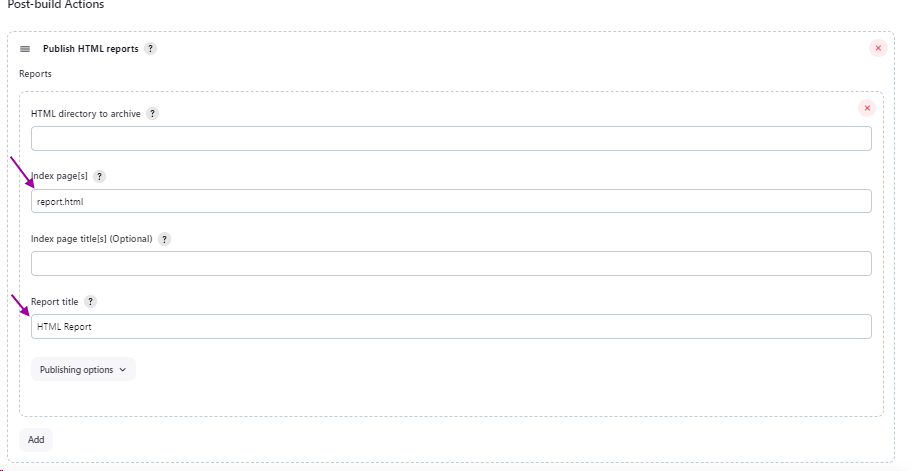
Step Two: Add the post-build action
Click on Add post-build action and select Publish HTML report.
In your Publish Html report section, edit the index pages and rename it as report.html. Next, edit your report title to any title of your choice.
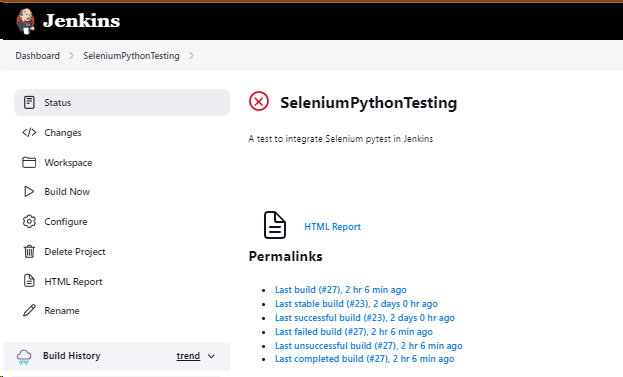
Click on Apply and Save. Next, click on Build now to run your project again.
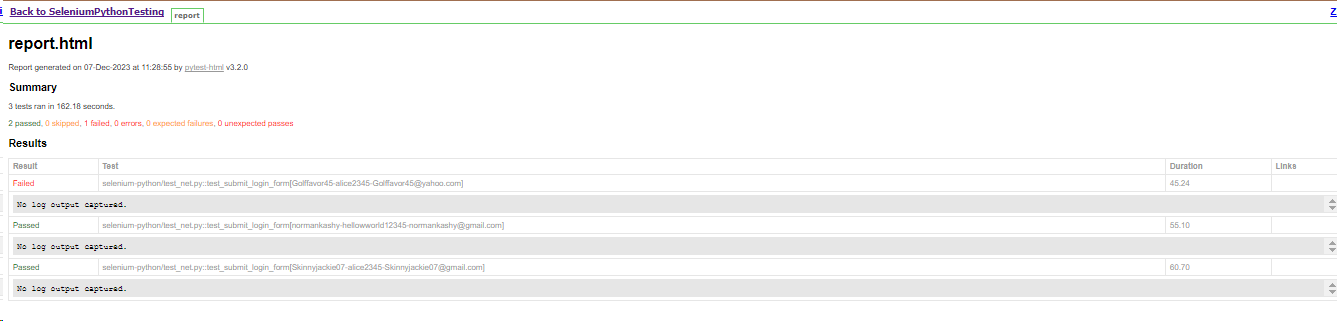
Once your project build is completed, you will see the HTML report. Click on it to view the report of your project.
Here is the outcome of my project build.
Conclusion
The integration of Selenium with Jenkins enhances the efficiency and reliability of test automation processes. This tutorial has journeyed through the essential steps involved, starting from recognizing the necessity for Selenium-Jenkins integration, understanding prerequisites, configuring Jenkins plugins and seamlessly integration Selenium scripts into Jenkins build steps.
By using these two powerful tools, teams can automate testing workflows, ensuring the continuous delivery of high-quality software, identify and resolve issues faster. In adopting the Selenium-Jenkins integration, teams are empowered to embrace a culture of continuous improvement where feedback loops are shortened and software quality becomes an inherent part of development mindset.